Are you sitting comfortably? Then I’ll begin…

I’m a big fan of George Clarke’s Amazing Spaces, so I thought I would share my own amazing space with the world. I’m incredibly proud of it, and love it to death – so I hope you enjoy this little peek into the creation of my unique work space. It’s been quite a long journey, and the studio has continued to evolve over time; this is merely the latest regeneration but it dawned on me that it would be no bad thing to have the whole journey (to date) recorded in one place.
Once upon a time I decided to build a studio at the end of my garden. It sounds so simple when it’s put like that, but it was quite an emotional thing. I had a lovely studio in Brentford (click here to see some photos of that), but my father died and I felt it would be better to move my studio closer to home so I could be around more for my mother. The garden seemed the logical choice.
My garden was in an absolute state, but tackling the redesign of the garden and the building of the studio was hugely cathartic for me. Everyone deals with grief in their own way, and mine is to channel all my energy into making things. It keeps me from brooding, and the sense of accomplishment helps to wash away the pain. So, despite the bitterly cold weather (dad died just before Christmas, and the garden/studio build went on from January through to April) I ploughed on and here’s how it went.
Before…it really was terribly neglected!


So I took down my old shed (which was in need of replacing anyway), dug out the concrete path (which had been there since I was born!), removed the old pergola, and basically ripped out everything.


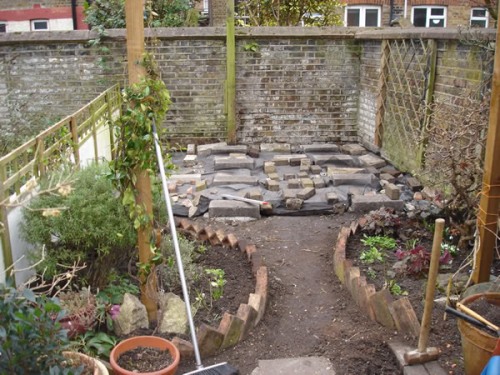

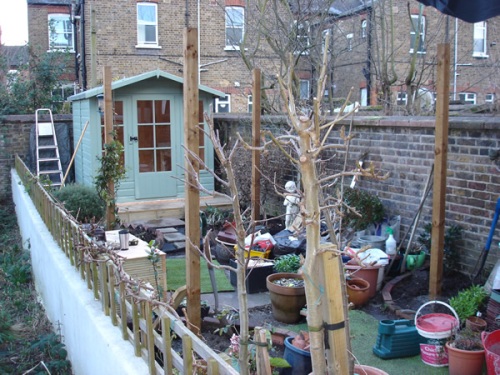
I decided on a layout for my flowerbeds, then laid decking at the far end of the garden. That end of the garden is very shady, so my thinking was that putting the shed on decking (as opposed to a concrete or paved base) would help the air circulate and thus help prevent damp. I had already decided to buy a prefabricated summerhouse, and found a great one at Tesco Direct for the bargaintastic price of £449 (it’s the 7×7 ft Chatsworth summerhouse, which has now gone up in price). The summerhouse arrived, and I painted it with Cuprinol Garden Shades (in Willow) before we put it up.

I actually moved all my stuff into the studio at this point, but I’ll get to that in a bit. For now let’s skip ahead to September of that year when I found myself in need of a bike shed. Not something I’d really thought much about (as I didn’t have a bike at that point!), but my partner was about to move in and he needed somewhere to store his. Funds were tight again, and I wanted something that would fit the available space perfectly…so of course I built something to fit!


It was a simple frame of timber (most of which was left over from other projects) and trellis. The roof frame was covered first with some heavy duty vinyl (a section of repurposed billboard advertising that I’d scrounged about a year earlier), then with offcuts of artificial lawn. The shell curtain at the front was a souvenir from a trip to Indonesia. The finished bike shed is perfect, and I even added a shelf on the trellis side to hold plant pots and other small things.
The garden itself is as much a part of the studio as the building itself. I love having a beautiful view to stare out at when I’m procrastinating…

The York stone was rescued from an elderly neighbour’s garden when she moved into a care home and the council ripped up her beautiful garden and paved over it (honestly, I could have wept), the artificial lawn was rescued from a skip (it had been thrown out by an events company that had only used it for one event), the chairs and little table were free (unwanted in another garden), a large number of the pots were given to me by clients who no longer had room for them, and even most of the plants were free! There are little personal touches all around the garden, from birdcages to odd signs, and everything in between.


The insect hotels and beehive compost bin were made using offcuts of wood, and random logs, bamboo canes and books. I’m very proud of the fact that my garden is mainly composed of free, recycled and repurposed things.
Onto the interior…
Furnishing the studio was a bit tricky, mainly because I didn’t have much money! I desperately wanted this shelf unit
 But frankly at £95 I thought it was ridiculously overpriced! So, what’s a girl to do? Build her own of course! The timber (exterior quality battens and gravelboards) for this cost less than a third of what the shop-bought version would be, and the finished product was double the size – can’t get better than that!


I used copper plant tags to make labels for the shelves, and fixed them on with drawing pins. Simple but effective. My desk was a bit of a problem because I really wanted a vintage school desk, but all the ones I saw online were very expensive (ranging from £40 for a single small desk up to £110 for a double desk). So initially I bought two small laptop desks from IKEA for £10 each. They served well for a while, and then I finally got lucky at a car boot sale and picked up a beautiful double desk for the wonderfully cheap price of £35. Yay! Click here to see how I cleaned it up ready for use in my studio.

A desk is no use without a chair, and I’ve been through three so far – two of which were found on the street, and the third (which is still going strong!) was given to me by a neighbour who no longer needed it. Click here to see what I did to chair number two.
The rest of the furniture has turned up in dribs and drabs. I acquired a small cupboard (in August 2012), another boot sale bargain at £8, and it met my growing need for storage perfectly.


A vintage filing rack (£8) completes my trio of boot sale furniture.

Space has always been an issue in the studio. At just 6×6 ft (internally – the exterior measurement is 7×7 due to the eaves), every square foot of space is precious, and my habit of accumulating things that “might be useful one day” doesn’t help matters! I’ve always made good use of the walls, putting up hooks and shelves as required, but this month we got a new puppy and suddenly I need even more space.
I had a vague idea of building a bench which would double as somewhere to sit as well as somewhere to store things. I sketched out some rough plans, and my initial thought was to build a bench that had room underneath for my cupboard and some crates, as well as having a compartment within the seat to hold my rolls of leather and paper. I did some rough calculations and decided that would cost me far too much in timber and plywood, so I went back to the drawing board.

The answer came to me in a flash: wooden pallets! They’re strong, and many independant builders merchants can’t wait to give them away to save on disposal costs. So I scrounged three of those (I thought we’d only need two, but better safe than sorry!) and then set my partner, Matt, to work. This is quite unusual because I’m normally very hands-on (and definitely the practical one in our family), but I’ve had some back problems of late and thought it was best to just act in a supervisory role this time!


Anyone who is thinking of repurposing wooden pallets should be aware that they’re constructed using threaded nails, which makes them an absolute nightmare to take apart. However, Matt persevered and after a few hours we had a finished bench, which fitten the available space perfectly. After spending quite a lot of time faffing around and tidying, here’s how it all looks.


The cupboard fits underneath, and there are also crates stacked under there too, plus I can use the space inside the pallet itself to store a few bits and pieces. I had intended to get a cushion pad to go on top of the bench, but it turned out that two blankets sufficed to make it comfy instead! The padded ‘headrest’ at the end is actually the back of one of my old chairs, which I sawed off (the chair had finally become too unstable to sit on).


I’ve got oodles more floor space, and have used the leftover bits of pallet to create storage for my leather and paper – and now there’s a decent amount of space for our puppy to run around. Oh, and of course the new bench is just perfect for a quick snuggle with the pup.


My studio is a very organic space, and I’m sure it will continue to grow and change in the coming years. For now though it meets all my needs, and pup’s too. I hope you have enjoyed reading about my amazing space, and I would very much welcome any comments or feedback you have. Oh, and if you’d like to see more photos of our beautiful puppy, then please visit The Loki Files.
Read Full Post »


